Help the CometVisu project
Participation in the CometVisu project is easily possible and also very welcome! Not only developers who would like to contribute new features or bugfixes are addressed, but also users who want to incorporate their own experience in improving the documentation.
Important
As CometVisu is developed by a bunch of people without any native english spoken person. Therefore Help an reviewing the english documentation is highly appreciated.
General preparations
Basically, there is no difference in the procedure, between changes to the source code and changes to the documentation, so the preparations are described here in a general way. The steps described below must be done once.
Both the source code and the documentation are maintained in the official Github repository of the CometVisu project: https://github.com/CometVisu/CometVisu
In order to work together you need a free account at Github. If this is created, one must fork the CometVisu project. To do this, follow these steps:
- login on github.com
- goto https://github.com/CometVisu/CometVisu
- press “Fork”-Button click on the top right and follow the instructions
This is a private copy of the CometVisu repository created in which you can make your own changes. Of course it is easier if you have the files on your local machine to edit them there. You have to clone your private copy of the CometVisu repository. To work locally with the files you need a git client. In this description we are using the version for the command line, but there are also versions available that use a graphical user interface. Since the procedures and terms are similar for all clients, the command line client will be used as reference in the further course. To ‘clone’ the repository, follow these steps:
- open a shell
- go to a folder in which the subfolder of the project is to be created
git clone https://github.com/<your-account>/CometVisu.git(<your-account> replace with your username)- go into the project folder and reload the submodules (icons and Qooxdoo framework) as follows
git submodule initgit submodule update
that’s it, the local working copy is in the CometVisu subfolder. With this all preparations have been made.
General approach
If you want to make a change, you should follow the procedure described here. Even if it seems unnecessarily complicated at first glance, especially if you just want to do minor changes. The experience shows that you have less problems in the long run, if you always stick to this workflow and it is thus becoming a habit. And this is how the workflow looks, first as an overview without details:
- create new branch
- make the changes you want to do
- Save changes to the local repository (this is something other than “save file”)
- Steps 2. + 3. can be repeated as many times as you think you have made all the changes
- Load changes to the private Github repository
- request that the changes be incorporated into the official repository
And now again the same steps in detail:
- Switch to the directory with the local repository on the command line
git checkout -b new-branches(The name of the new branch can be chosen freely, as long as it is not existing yet) - Edit and save the desired files with an editor of your choice
git commit -a -m "Short description of the change"(Formulate the description in English if possible). Withgit statusyou can first check which changes are all commited- Steps 2. + 3. can be repeated as many times as many times as you want until you have made all intended changes
git push- Go to the github page of the private repository and click on new pull request. On the following page Comparing changes to the right of the button head fork:<username>/CometVisu there is the button compare:<branch-name>. Click on it and select the branch with the changes. Then you get an overview with the changes and can click on the green button named Create pull request (green button top left). Then you can describe again, which changes the pull request contains. In general, this is already pre-filled and you can by clicking on “Create pull request” (green button bottom right). This creates the pull request
Now you have to wait until one of the maintainers of the CometVisu project reviewed the pull request. In addition, some automated checks are performed on the pull request to detect potential problems. If everything is alright, the pull request is gemerged by one of the the maintainers and so the changes are becoming part of the CometVisu project. If the maintainer has suggestions for improvement, he will do so through comments in the pull request. If this is the case, the advantage of the extra branch created in step 1 will now come into play. You just have to execute steps 2, 3 and 5 to execute the correction requests of the maintainer. Thus, the changes are automatically part of the existing pull request.
Once all changes have been agreed and accepted, the branch can be deleted.
git branch -D name-of-the-branche
If you e.g. Starting with new changes in a new branch, you can switch
between the branches as you like and even edit multiple pull requests
and changes at the same time without mixing them in terms of content.
You can always switch to another branch after a commit (see step 3)
git checkout name-of-the-branche.
Keep repositories in sync
With github.com
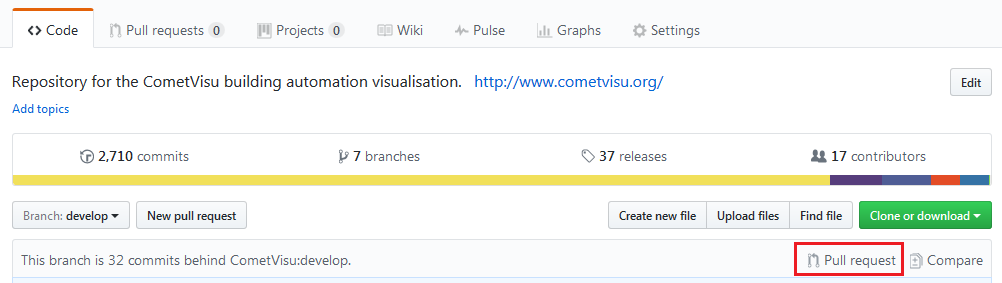
In order to keep the already merged changes made by other developers synchronous with their own fork, a pull request must be made from the private repository. This branch is ... commits ahead of CometVisu: develop. Shows how many changes have been made since the last sync. Next to it is the link to the Pull Request, which in the following page shows the changes that can be merged into the private repository.
Pull request for synchronization between main and private repository
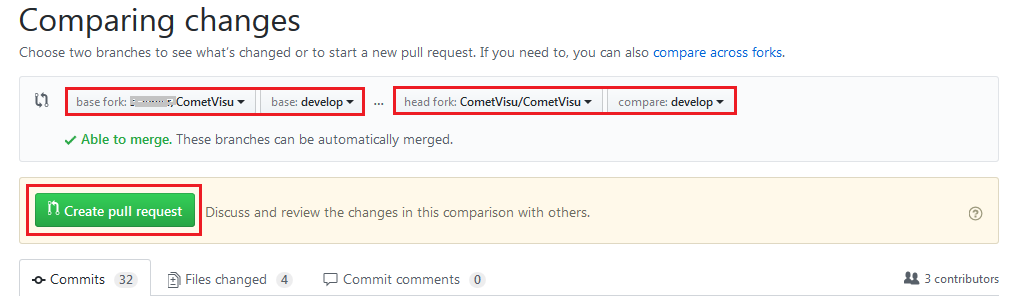
Comparison of the changes
Important
Important in this comparison is that your own base fork is on the left and the official head fork is on the right.
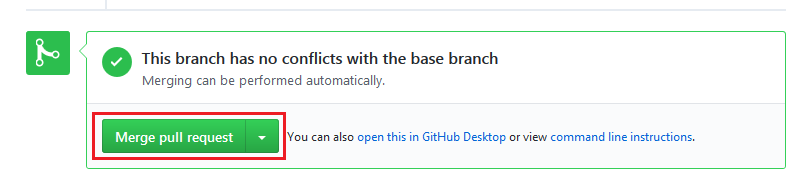
Create Merge pull request
Accepting all changes synchronizes the changes from the main repository to the private repository.
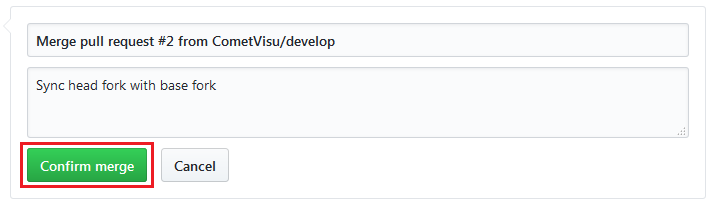
Merge confirm
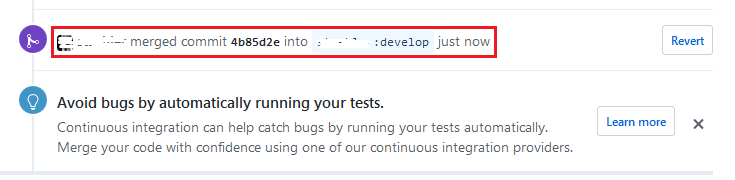
Successful synchronization
The local copy of the private repository must then be updated as well.
To do this, you have to switch to the branch develop in the local
repository (git checkout develop), where all the changes made by
the developers are merged. The git pull command synchronizes
the local and private repository. Now that all repositories are in sync
again, you can continue with new changes to the documentation as described
under 1. above.
Via the command line
Of course you can also keep the local clone of his repository in sync via command line commands. To make this as easy as possible, you need to configure the remotes of your local clone accordingly.
Hint
For the following examples it is assumed that the user name is
gh-user and the CometVisu repository has been cloned via SSH
(git clone git@github.com:gh-user/CometVisu.git). If cloned
over HTTPS (https://github.com/CometVisu/CometVisu.git) the
URLs will look different.
Abstract
# query current settings
git remote -v
>>> origin  git@github.com:gh-user/CometVisu.git (fetch)
>>> origin  git@github.com:gh-user/CometVisu.git (push)

# Get updates from the original repository
git remote set-url origin git@github.com:CometVisu/CometVisu.git

# check current settings
git remote -v
>>> origin  git@github.com:CometVisu/CometVisu.git (fetch)
>>> origin  git@github.com:gh-user/CometVisu.git (push)

# synchronize develop branch with original repository
git checkout develop
git pull
Detailed approach
The current settings can be queried with the command git remote -v.
Usually, this returns the following values:
origin      git@github.com:gh-user/CometVisu.git (fetch)
origin      git@github.com:gh-user/CometVisu.git (push)
This means that when updating (fetch,*pull*) and also
pushing git uses the user’s fork on github.
But you want to load changes to the main repository into
the local clone as easily as possible. To do this, change the
fetch URL of the remotes with the following command:
git remote set-url origin git@github.com:CometVisu/CometVisu.git.
After that, git remote -v should deliver the following output:
origin      git@github.com:CometVisu/CometVisu.git (fetch)
origin      git@github.com:gh-user/CometVisu.git (push)
This fulfills the requirements and you can create a local develop
branch (this contains the latest developments) simply by
a git pull update.
Hint
This procedure is only advisable if you only make changes to the
CometVisu on one computer. If you use several computers at the
same time, you will inevitably have to make the changes you have
from the other computer in your own fork pushed got into the
local clone. For this you can set up a second remote with
git remote add fork git@github.com:gh-user/CometVisu.git and then pull
git pull fork develop
Todo
- other useful git commands (branches delete, status, ...)
- merge-conflicts
- Flowchart for workflow change -> pull request
Help with the documentation
The CometVisu documentation is produced using the Sphinx - Python Documentation Generator generated. The documentation is therefore written in the reStructuredText format (RST for short). This is a simplified markup language that is easy to read in plain text form and has the advantage of being simple to be converted to other formats [RST-Wiki]. For more detailed information about the syntax of the RST format please consult those links:
A general introduction that provides both the most important basics of syntax and special ones. However, this section is intended to provide specifics used in the CometVisu documentation. With the knowledge of this section, it should be possible to write your own contributions to the documentation.
Local generation of the HTML documentation
The command ./cv doc translates the German documentation from
the RST to HTML. For the English version, ./cv doc -l en
must be called. Therefore you have to be in the root folder of the CometVisu.
If every went well, it should start like this.

Start building
After completing the build process, there should be a new docu under
doc/manual/de/_build/html/ and/or doc/manual/de/_build/html/
Important
If the project is set up correctly, but the documentation generation still fails due to not fulfilled dependencies, it must be checked whether the same Python versions (in particular Python 2 vs. Python 3) are used.
Write documentation with VisualStudio Code
The Editor Visual Studio Code offers a plugin that allows you to view a live preview of the written documentation.
Important
Some of the tools used are only available on Linux. The Live Preview is therefore currently not available in Visual Studio Code on Windows. For Windows users, therefore, Visual Studio Code in a virtual machine with Linux (Ubuntu, Mint, ...) is recommended. see Set up VM for detailed information.
After installing the editor, the extension restructuredtext
(via Shft + Ctrl + X or View -> Extensions ) must be installed. Search
for restructuredtext inside the extensions. Also a spell checking extension
is recommended.
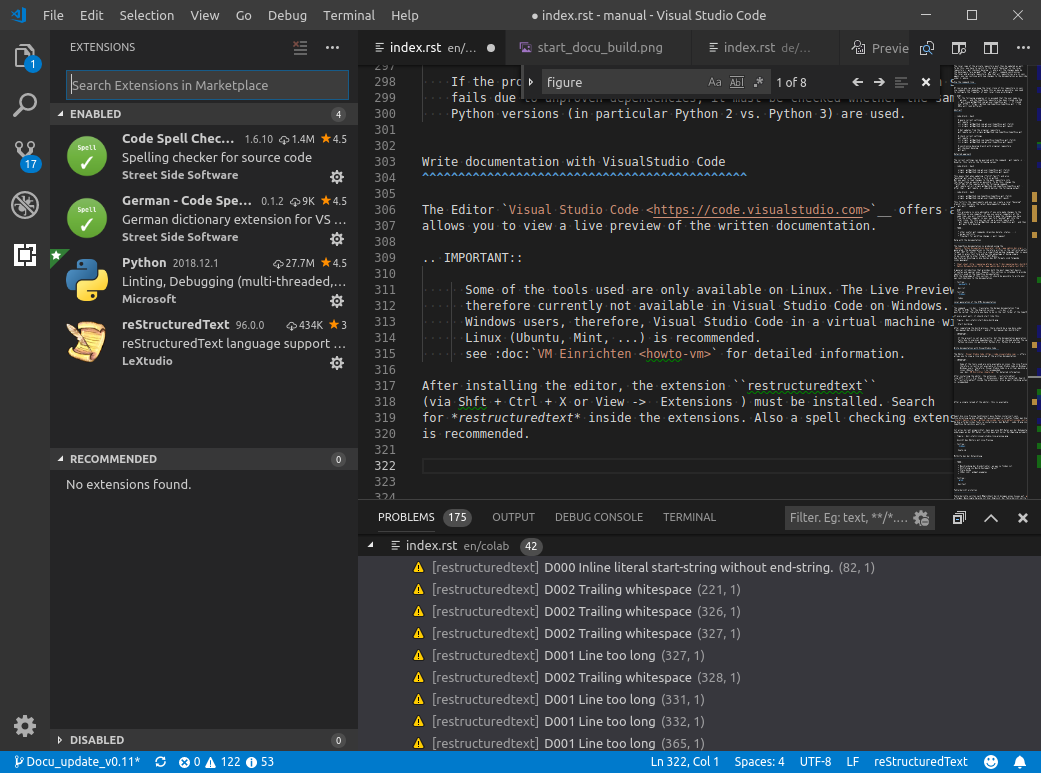
Install extensions
After a single reload of the editor, the extension is available.
For the Live Preview to work, Python must be installed.
A guide to create the necessary prerequisites can be found here:
Install Sphinx.
To install the required tools, use the
sudo -H pip install -r utils/requirements.txt command
Run CometVisu directory.
If Sphinx is setup correctly, you can see the configurations available at the footer.
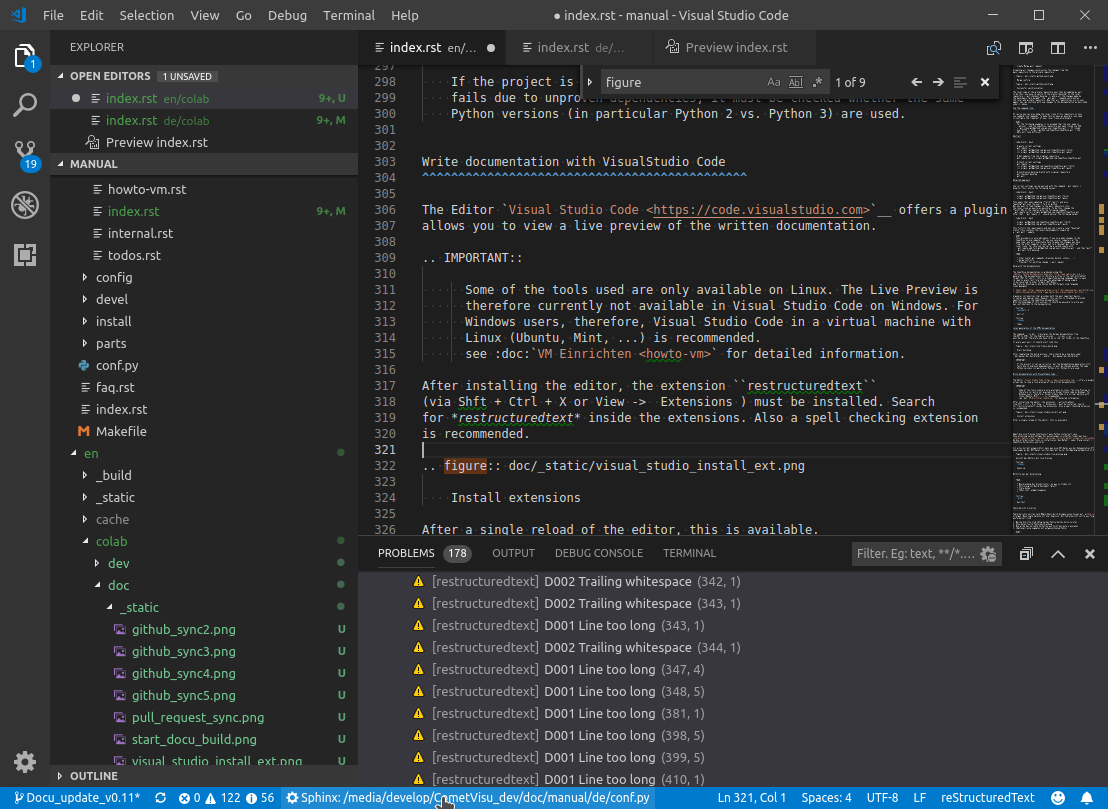
By clicking on the footer you can choose between the de or en config to be used for the preview. So if you work on the english docu make sure en is selected, else you will not see your correct preview.
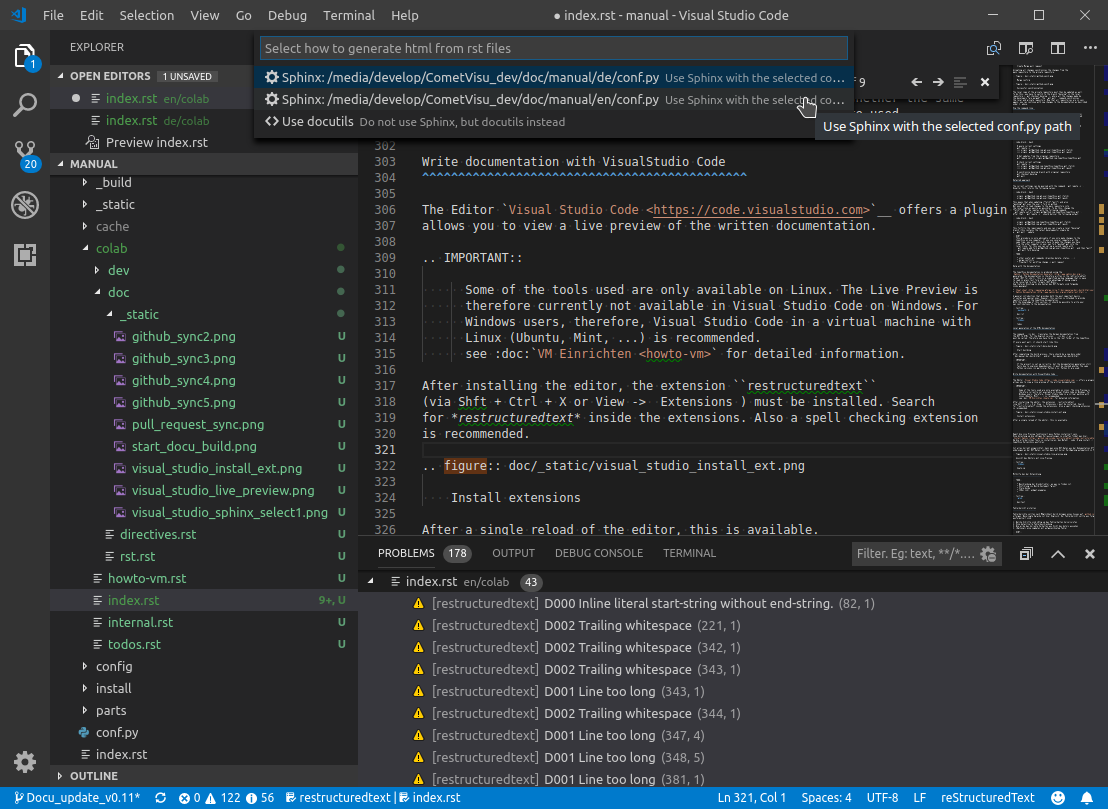
Select a Sphinx config
If everything is set up correctly, you can open an RST file from the documentation and open the Live Preview window with `` Ctrl + Shift r``. Changes to the RST file should then be automatically displayed in preview windows with a short delay.
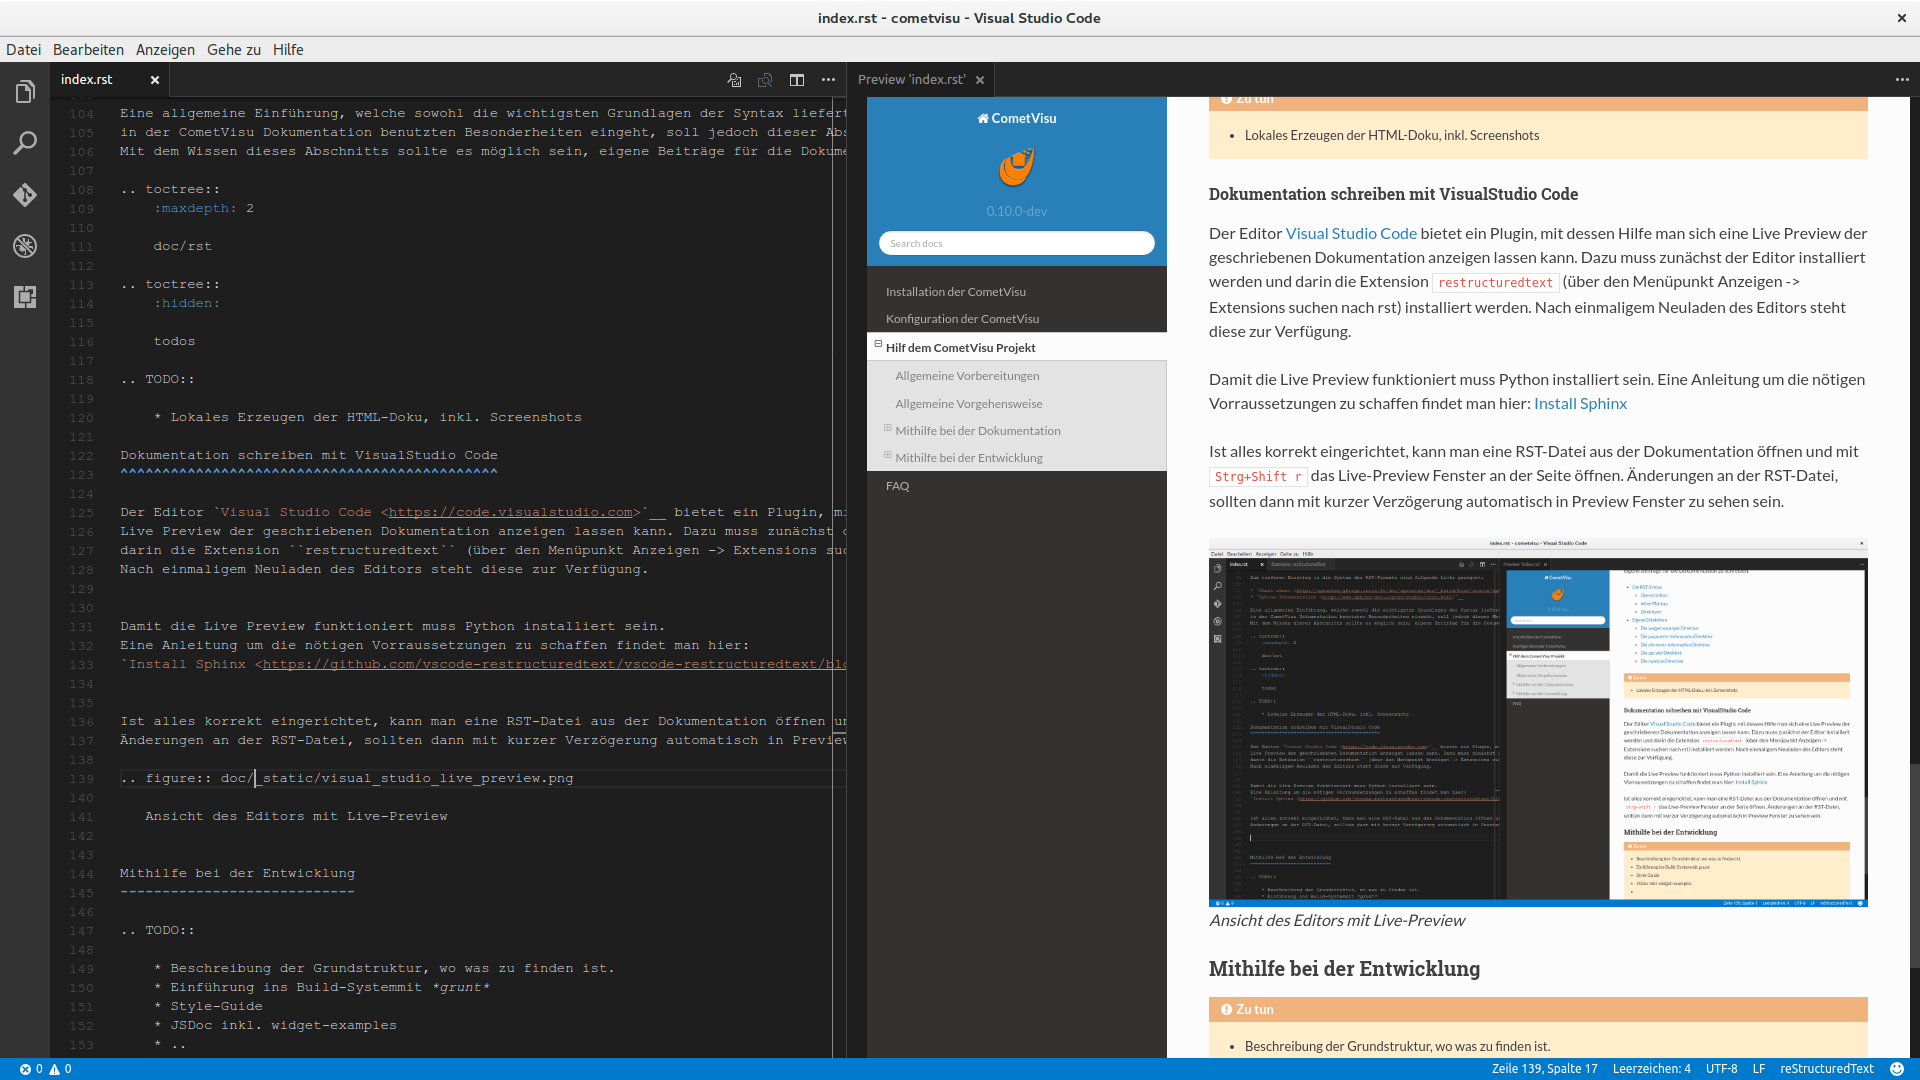
Ansicht des Editors mit Live-Preview
Help with the development
Todo
- Description of the basic structure, where to find something.
- Introduction to the build system with * grunt *
- Style-Guide
- JSDoc incl. widget-examples
Create an error report
Bug reports should be made by creating an issue on github.com respectively. Preferred language is English here. The bug report should consist of the following parts as detailed as possible are formulated
- Error reports should be after What steps are necessary to cause the misconduct
- A detailed error description
- What would the correct behavior look like from the author’s point of view?
- [Optional] a log file with recorded error
Hint
With uncertainties regarding the error can first in KNX-User-Forum or at Gitter ask for help.
Bug reports with replay files
Beginning with version 0.11.0, there is an additional way to make troubleshooting easier for developers and to improve the bug reports. Users can record the behavior of the CometVisu and provide a so-called replay file (preferably attached to the issue as an attachment).
Hint
The recording of the replay files can be activated with the URL parameter reporting = true
(see: URL-Parameter). Once the error has been corrected,
the log replay can be downloaded by entering the downloadLog() command
in the browser console (open with F12 key). In addition to the automatic
download of the file, its content is also shown in the console.
So you can control which data is contained in the file.
The replay files contain the configuration file, all communication with the backend and the user interactions (for example, clicks on widgets, etc.). Therefore, the user must agree to publish this data. It may therefore be advisable to create bugs with a modified configuration file, e.g. not containing sensitive data. The big advantage of these replay files, however, is that the developers can see a mock up of the original setup when playing these files. This allows the developer to see the error directly, fix it and test is the bug-fix works.
Of course, there are also limitations, because not everything can be recorded by the replay files. If a user e.g. has adapted the existing designs and/or uses own icons/images, that are not part of the CometVisu, those files will not be part of the replay file and are missing when the file gets replayed.
| [RST-Wiki] | https://de.wikipedia.org/wiki/ReStructuredText |