Installation on the Timberwolf server with the app
The easiest way to install the CometVisu on the Timberwolf-Server is by using the supplied app.
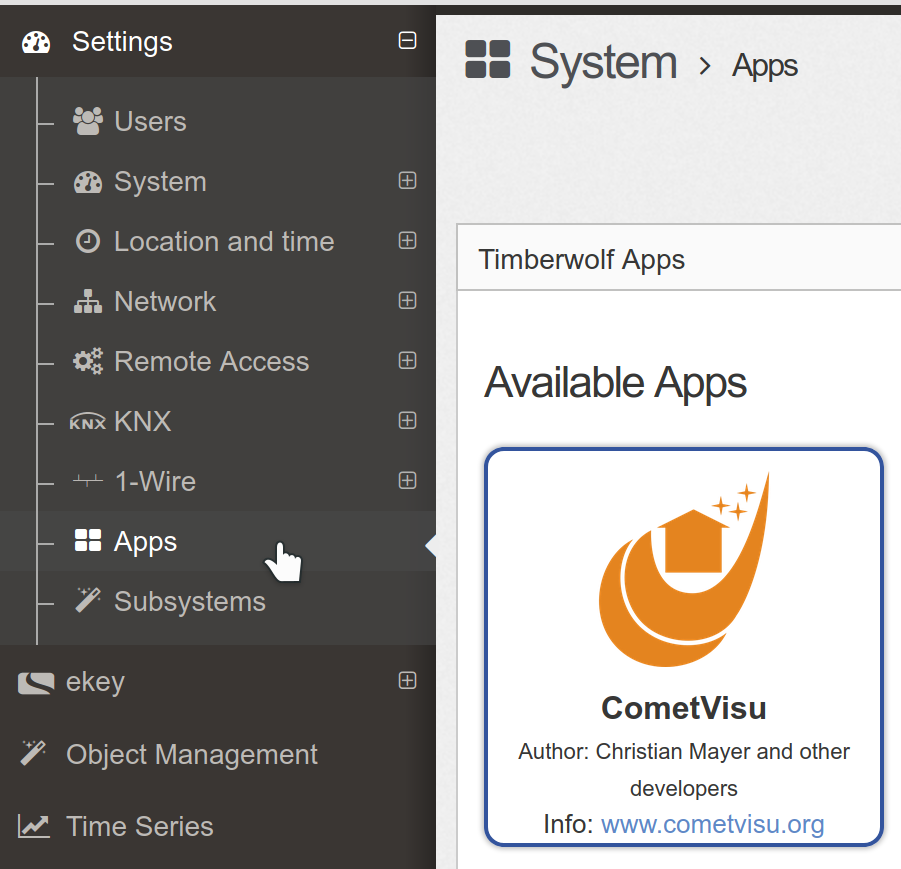
Selection of the CometVisu app on the Timberwolf user interface
When it was installed by clicking on the green “+” the CometVisu will be listed on the “active apps” section. Behind “URL” is the link shown that can be used to directly access the CometVisu.
Update
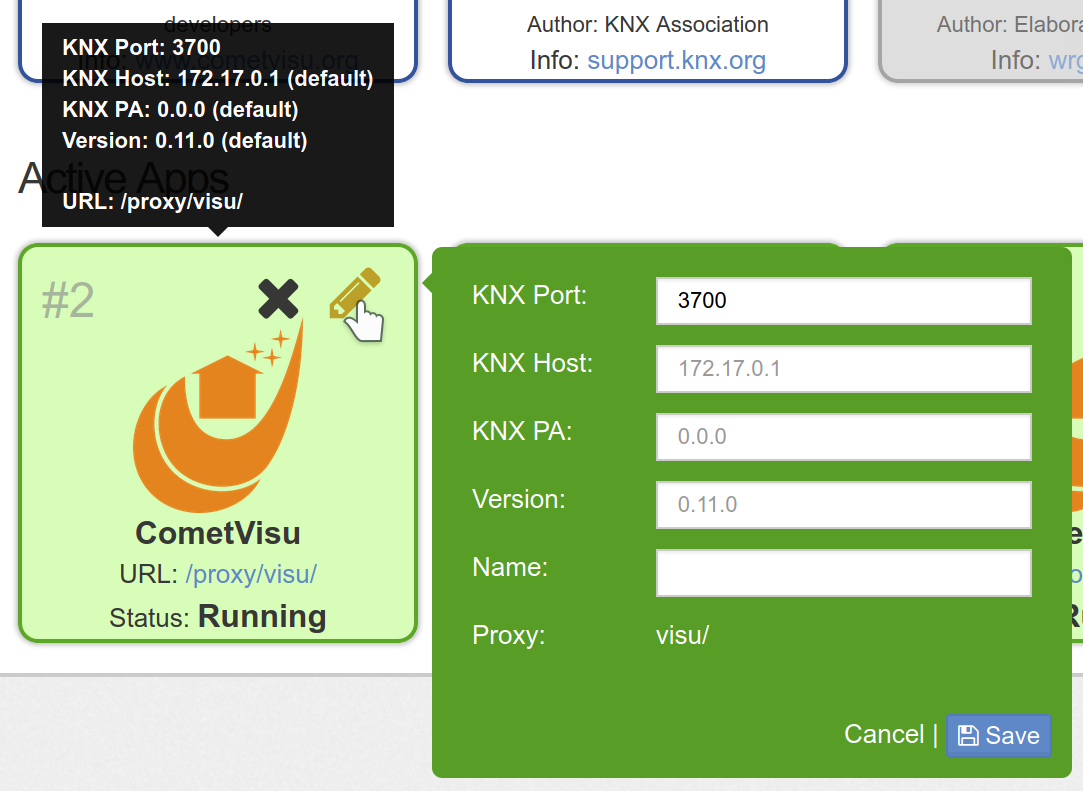
Installed CometVisu app
The app can be configured by using the pen symbol. Most important is the row “Version”. The version number given there will be installed. By changing this number it is possible to switch to this version number.
Installation on the Timberwolf with Portainer
The advanced method to install the CometVisu on the Timberwolf server (only necessary in rare occasions, the installation by app is recommended) is to use the Docker administration interface Portainer<https://portainer.io/>. This instruction can be used mostly also for other systems that are based on Docker and Portainer.
Installation
With this tutorial the CometVisu will be available on the Timberwolf
server via HTTPS under the address https://<my timberwolf>/proxy/visu/.
Basically, these steps are also suitable as a reference for installations via portainer on other systems, but the steps must be adapted in detail, as there usually no proxy is available, which makes the CometVisu accessible via HTTPS.
Create Volumes
Volume for Config Files
First, create a volume to store the configuration files and keep them while rebooting and updating the container.
Necessary steps are: Volumes → Add Volume → Name:
CometVisuConfig → Create the Volume

Create Volume with Portainer
This volume can be filled from the outside with the config files or best by using the Config-Manager.
Volume for RRD
This step is optional and only necessary if you want to use the Diagram Plugin with RRD files. When using the InfluxDB this step can be skipped.
The steps for creating the Volume for Config Files must
be repeated, but the name CometVisuRRD is hereby meaningfully chosen.
The filling of this container must be external, e.g. by
another container that simultaneously incorporates this RRD container.
Important: The internal format of the RRD files is architecture specific. Thus, the RRG files from WireGate (32 bit architecture) can not be used directly on the Timberwolf (64 bit architecture) [1].
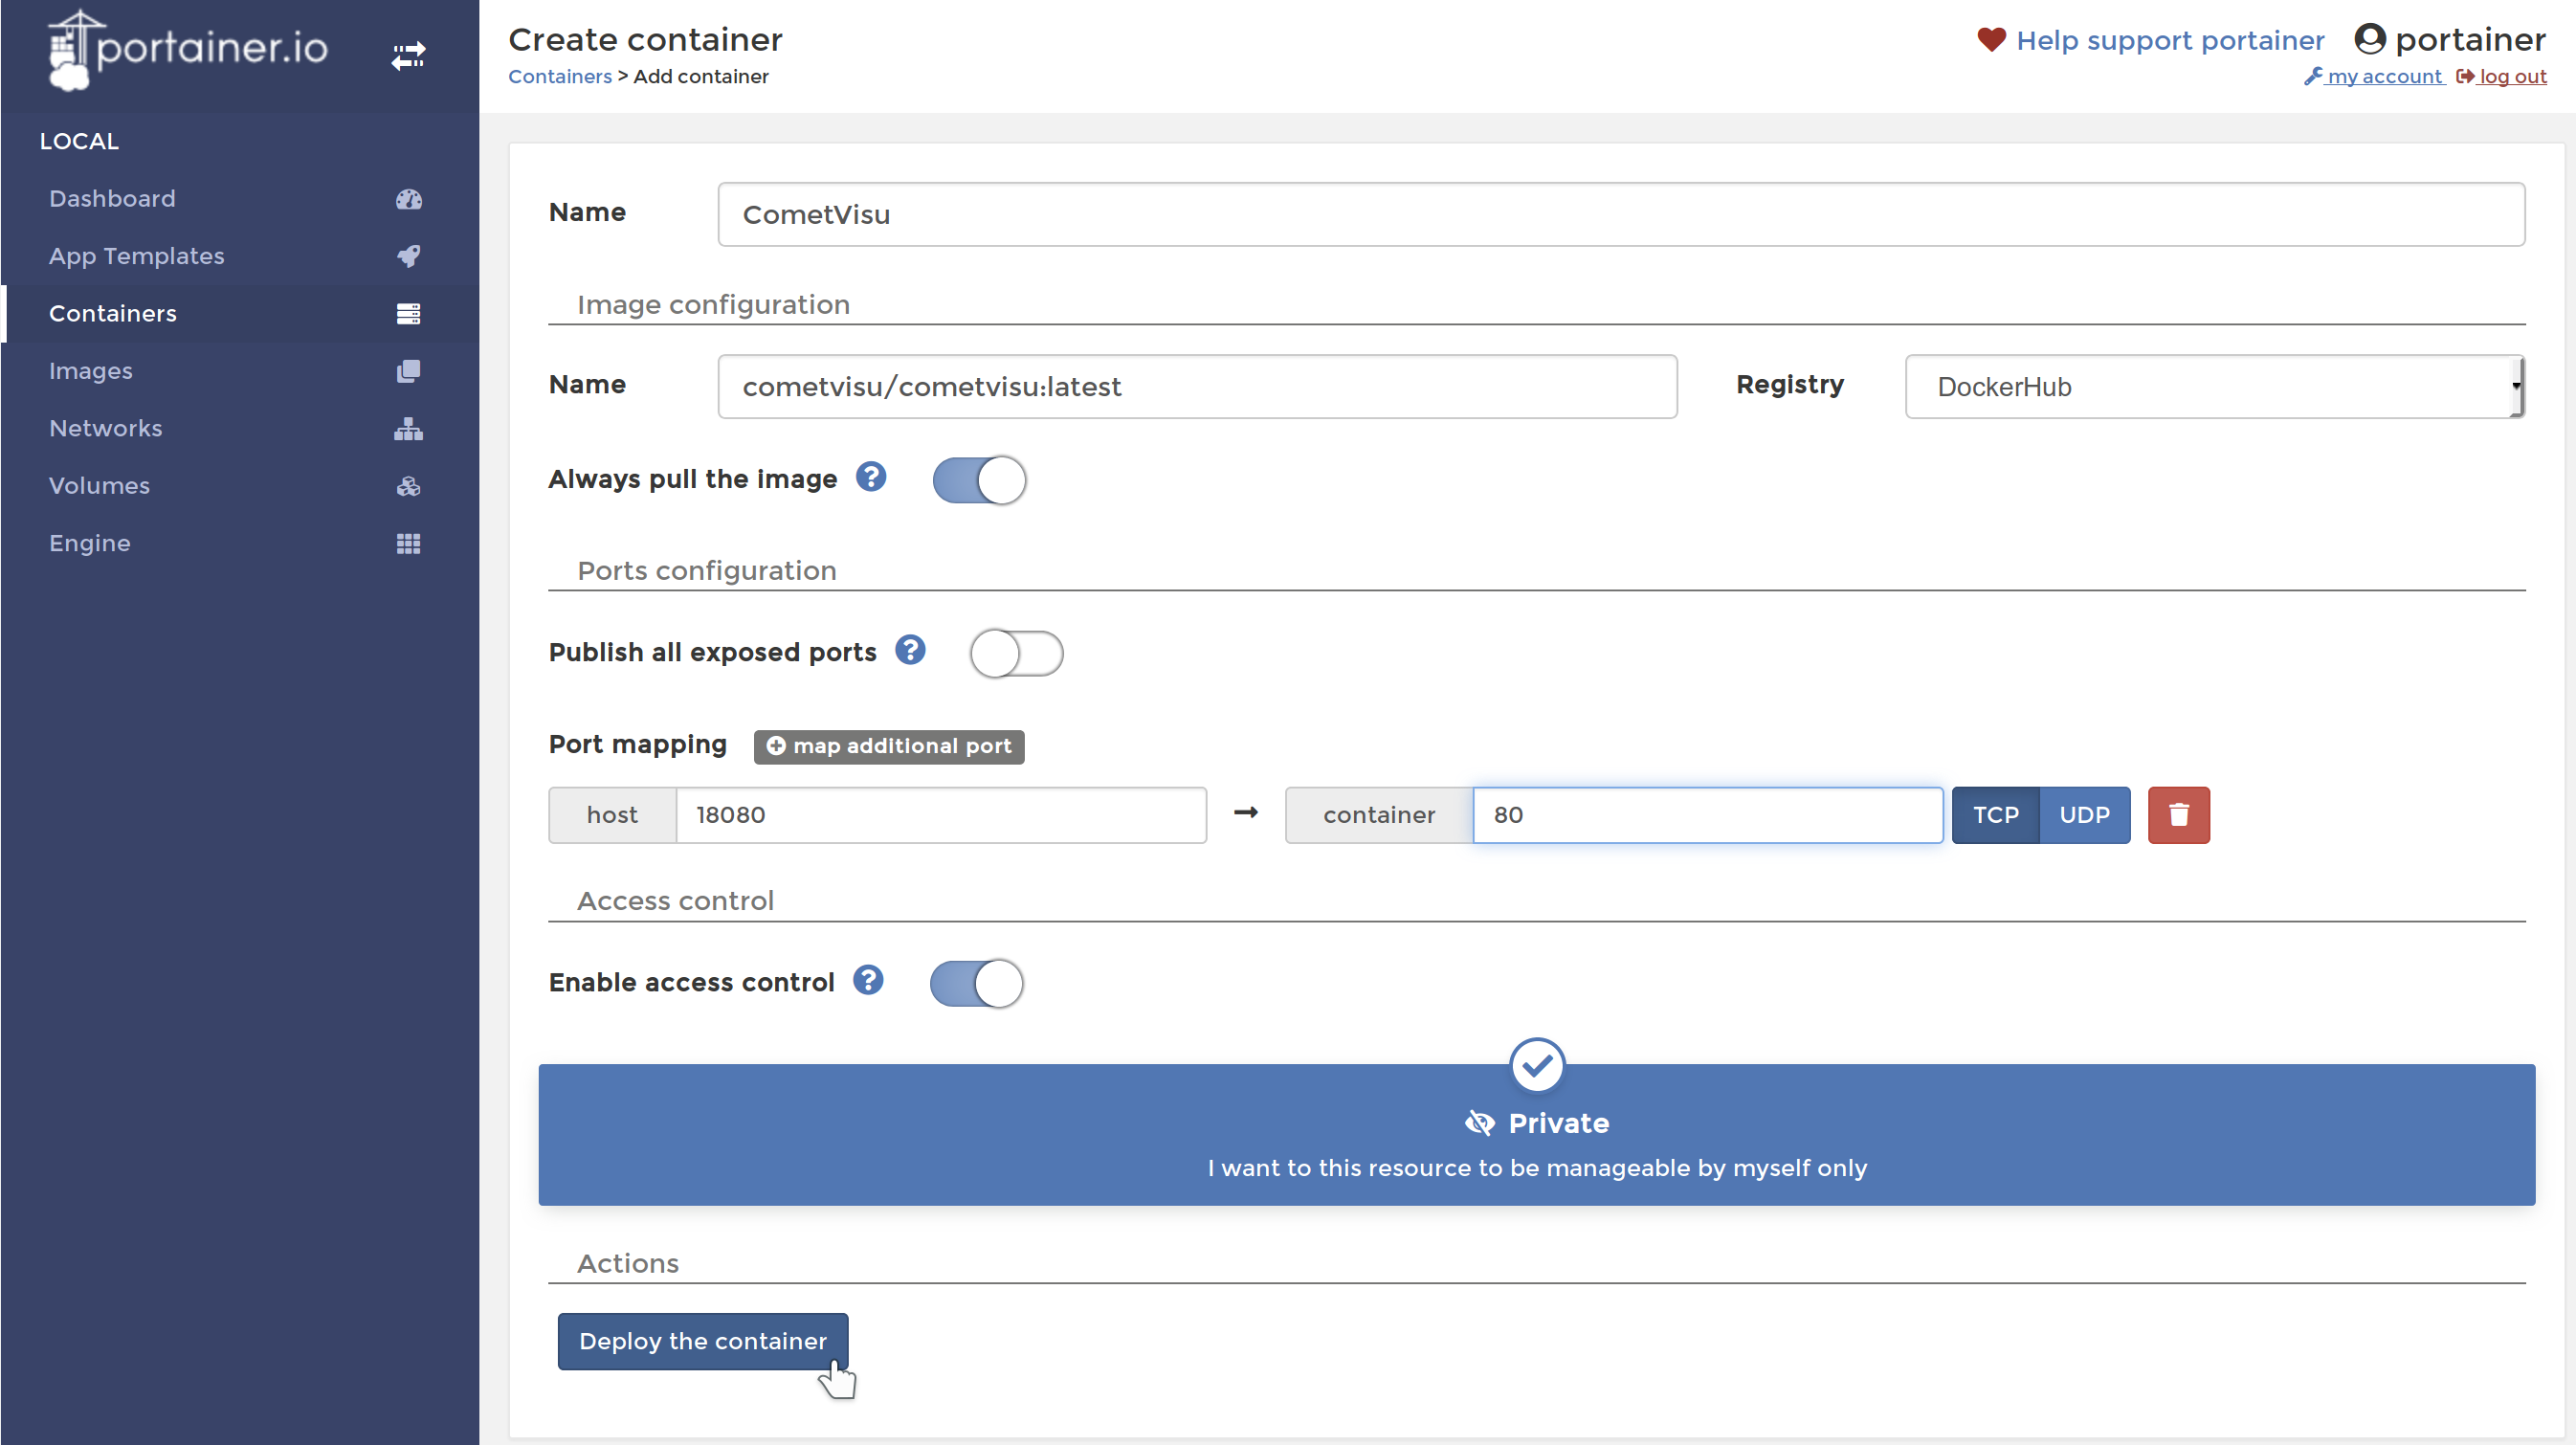
Creating a Container
Under: Containers → Add Container
Name:
CometVisuImage configuration: Name:
cometvisu/cometvisu:latestfor the big servers (TWS2xxx) and for the rail mounted smaller serversPort mapping: host
18080, container80Advanced container settings:
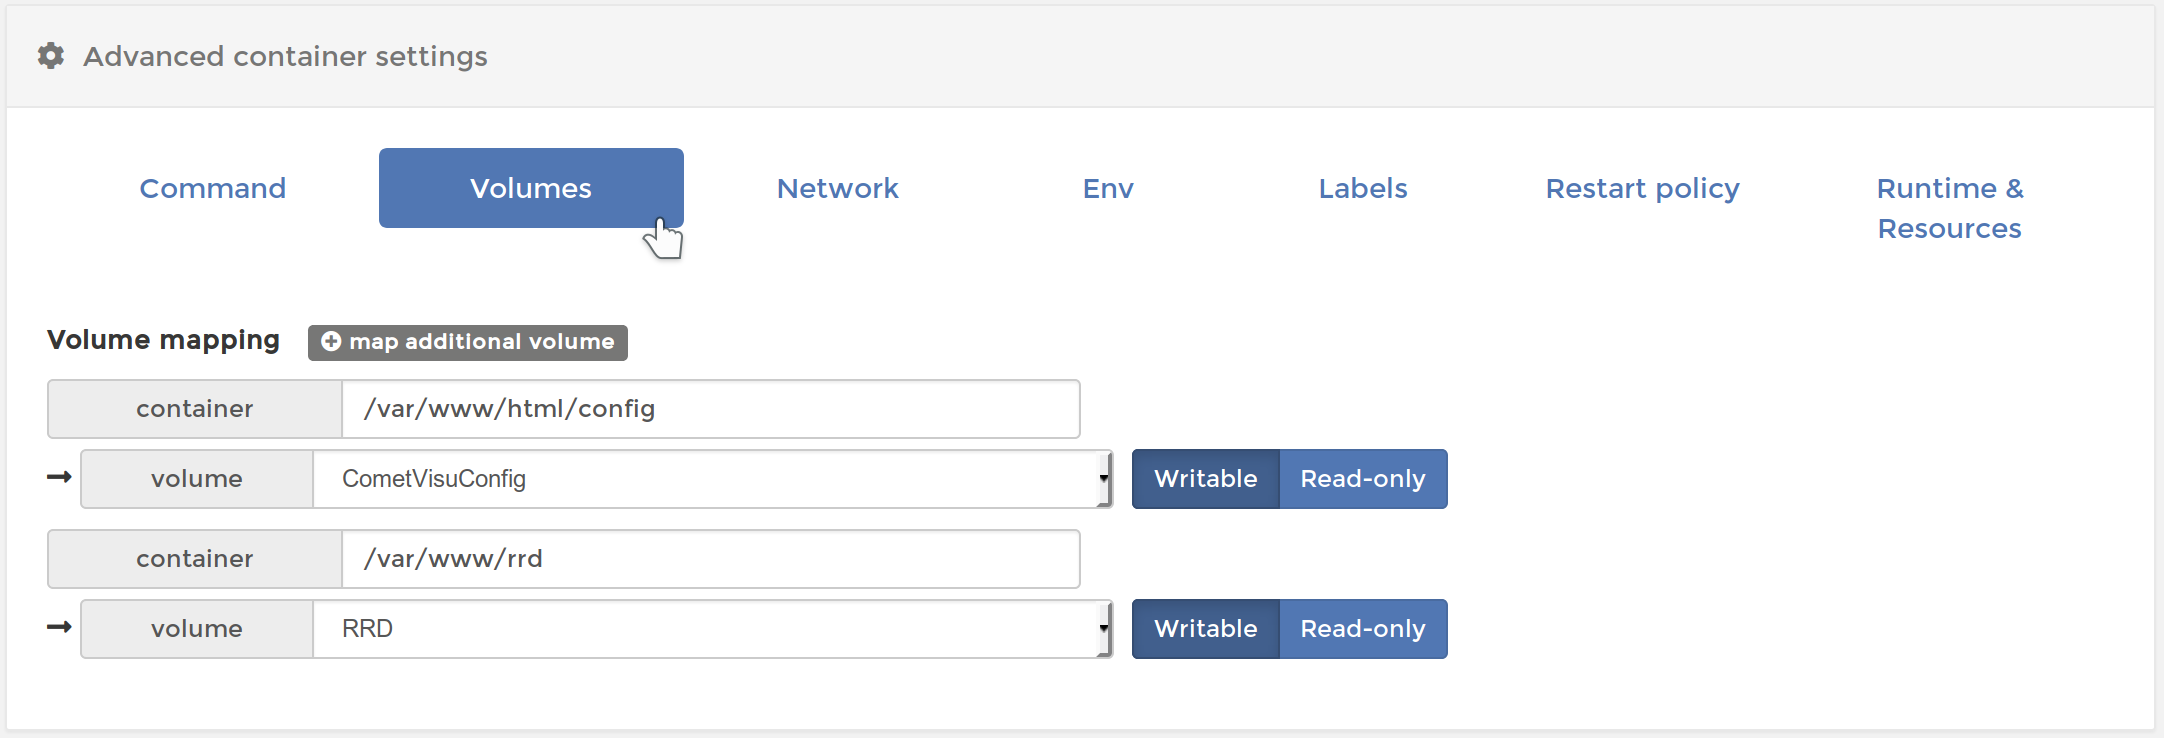
Volumes: Volume mapping
container:/var/www/html/config⭢volume:CometVisuConfig(bis einschließlich Version 0.10.2)container:/var/www/html/resource/config⭢volume:CometVisuConfig(ab Version 0.11)container:/var/www/rrd⭢volume:RRD(Optional, wenn RRD genutzt werden soll)
Env: Environment variables
name:CGI_URL_PATHwithvalue:/proxy/visu/cgi-bin/Depending on the local environment, additional customizations may be required, as specified in the section of the Docker Container.
So it may be necessary to set a value for
KNX_PAother than the default1.1.238if this physical address is already occupied or if another line is to be used as1.1.It is also important that the port of the KNX interface is correct. At the Timberwolf it can be looked up at Settings → KNX → Interfaced:
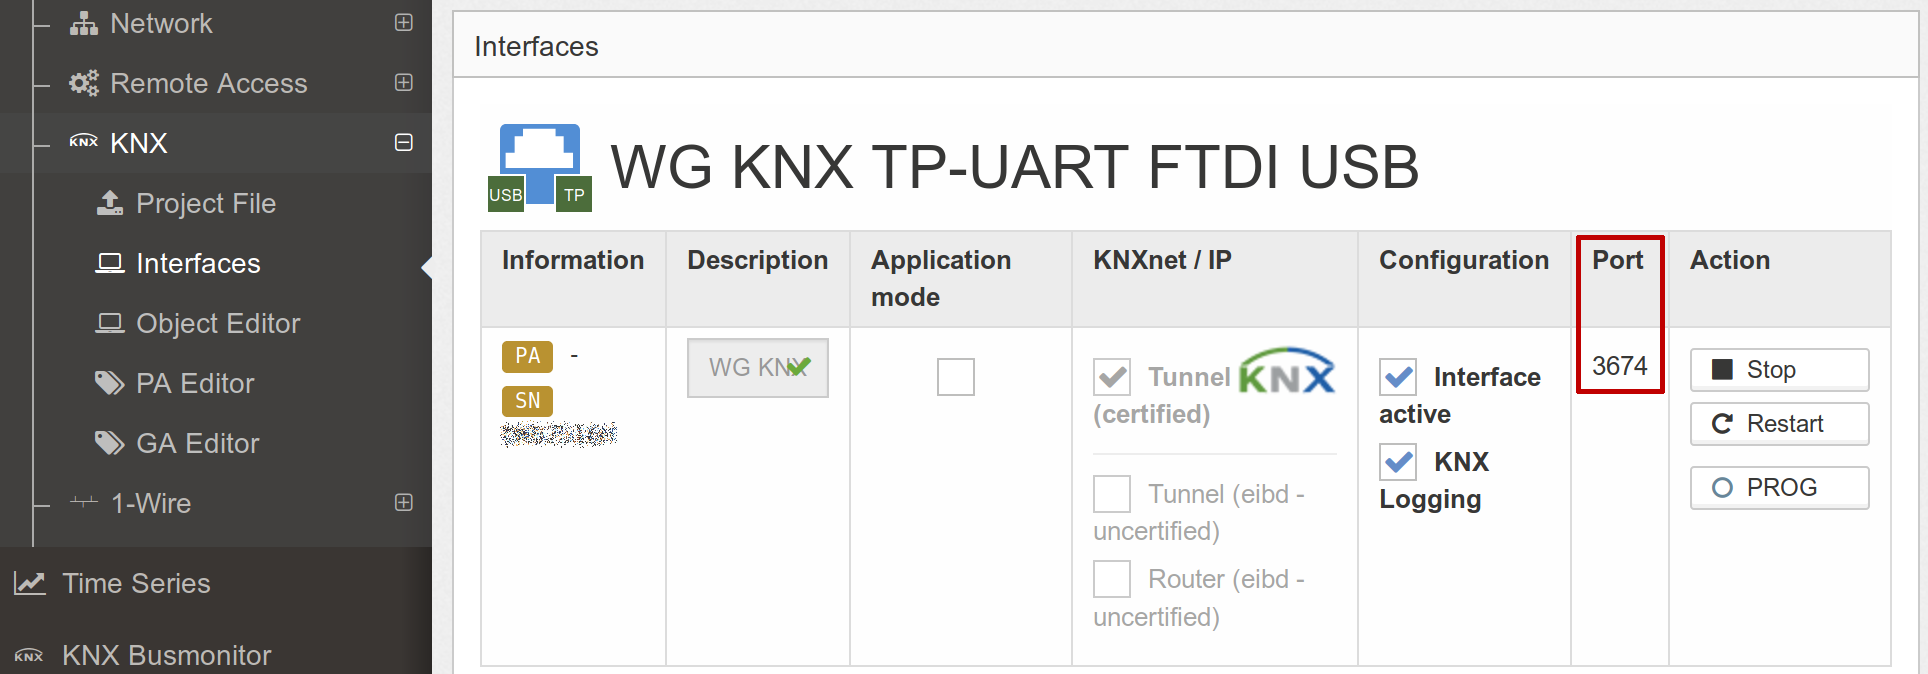
Should it be different to the default of
3700then the environment variableKNX_INTERFACEshould be changed accordingly, in this example toiptn:172.17.0.1:3674.
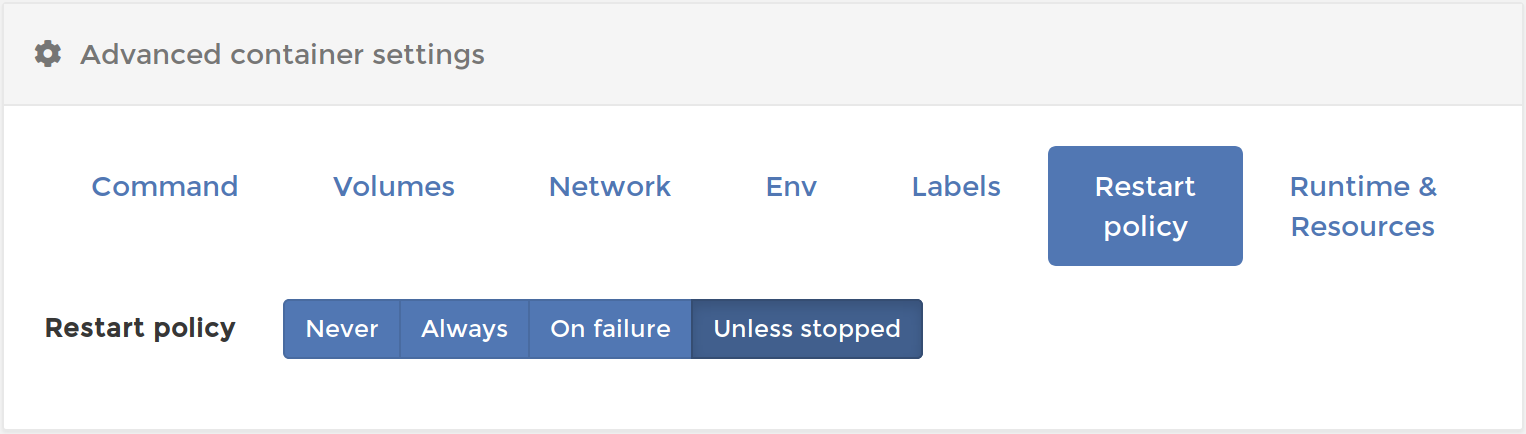
Restart policy:
Unless stopped
Create Container at Portainer
Configure Container Volumes at Portainer

Configure Container Env at Portainer
Configure Container Restart policy at Portainer
Then create the container by pressing Deploy the container.
Proxy setup
At the Timberwolf Frontend: Settings → Remote Access → Reverse Proxy
URL:
visu/, Targethttp://127.0.0.1:18080/
Accept with Add

Add Timberwolf Proxy-Entry
CometVisu is now available: https://<mein timberwolf>/proxy/visu/
InfluxDB access
Hint
The InfluxDB access as well as the hidden config was introduced with version 0.11.0 and isn’t available in earlier versions.
To access the time series in the InfluxDB its credentials must be added to the
hidden configuration of the manager.
To get them you must click at the Timberwolf server in the Portainer
menu on the i after the line “How to access the time series database from
within a Docker container” and note the Username and Password.
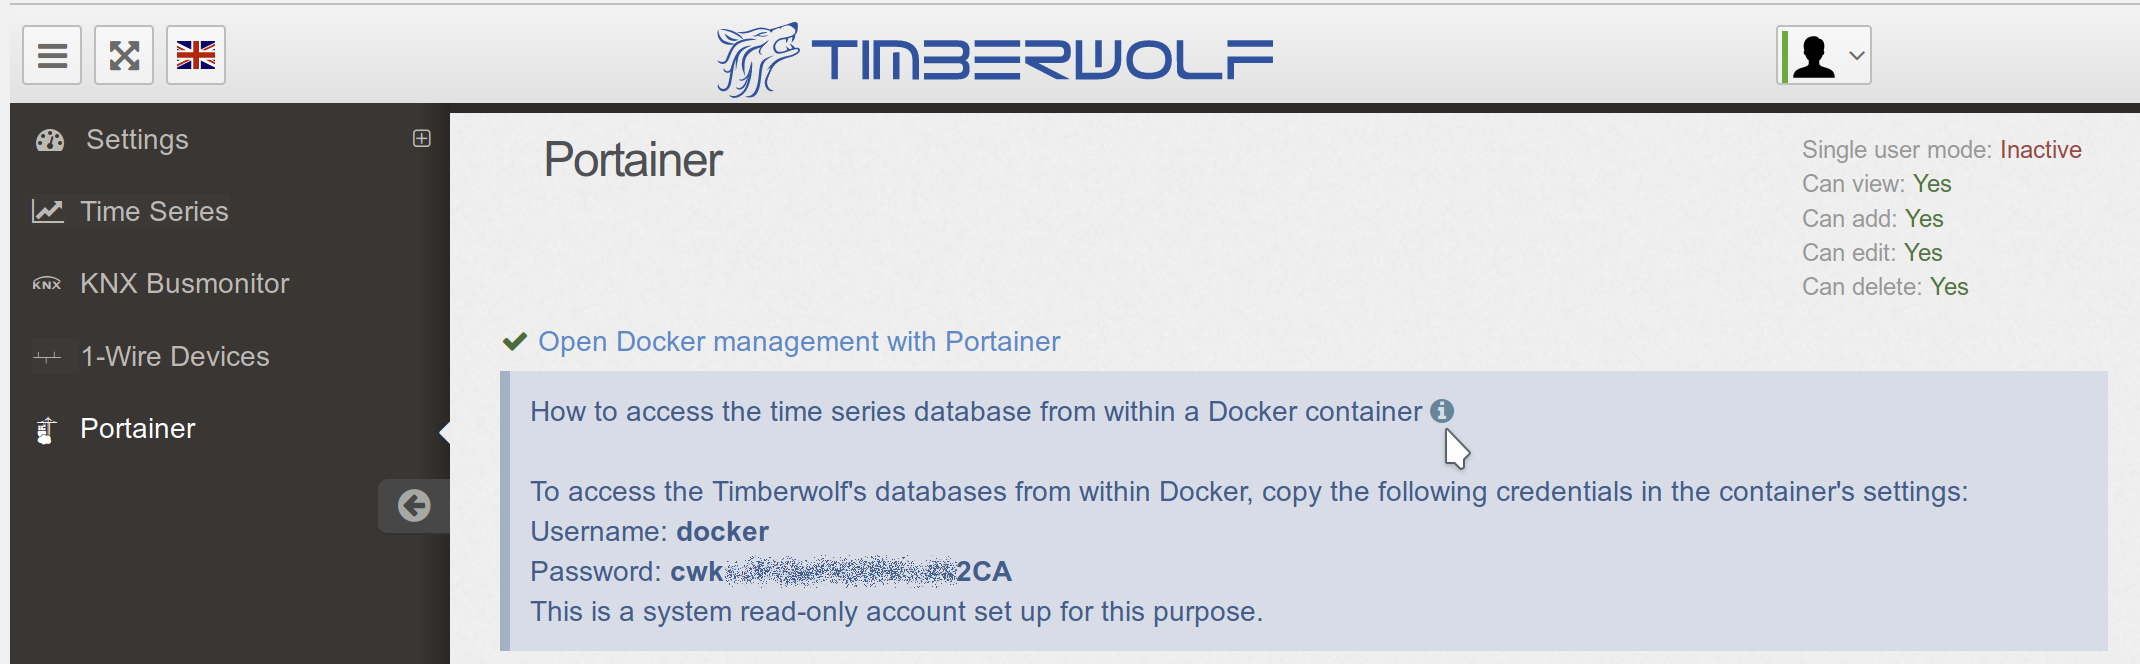
Timberwolf InfluxDB credentials
In the hidden configuration of the manager you must create an entry with the properties:
Name:
influxKey and value:
uri:https://172.17.0.1/proxy/ts/query(Should you have not followed this manual and used a different network setting you might need to change here the IP address accordingly)user: Username from the credentialspass: Password from the credentialsselfsigned:true

Timberwolf InfluxDB credentials in the manager
Updates
Replace Container
Under Containers → CometVisu pressing the button Duplicate / Edit
to invoked the menu for refreshing the container.
Here’s to make sure Always pull the image is active.
Under Advanced container settings → Labels the labels should be deleted in order to be able to recognize later which CometVisu container version is installed.
If you want to change from version 0.10.2 to a version from the 0.11
series, then under Volumes the config path from
/var/www/html/config to /var/www/html/resource/config.
Actions → Deploy the Container will now replace the container with the latest version.

Replace Container at Portainer with a new version
Afterwards the security question has to be confirmed.
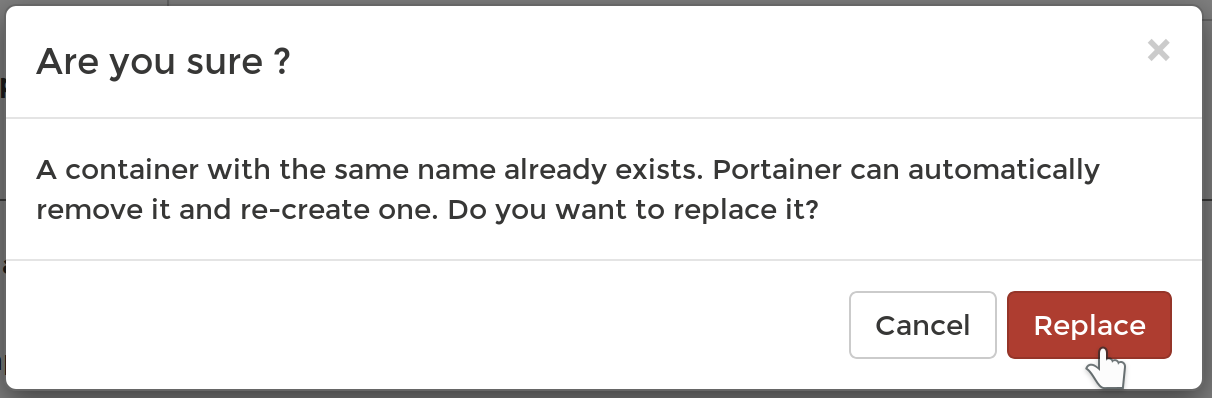
Confirmation to replace the container at portainer with a new version
Cleanup
When a container is replaced with a new one, the old one remains as Unused in the system and continues to occupy space. This can be deleted under Images.
By marking the image to be deleted (recognizable by the label Unused and the corresponding tag) the image can be removed with Remove.
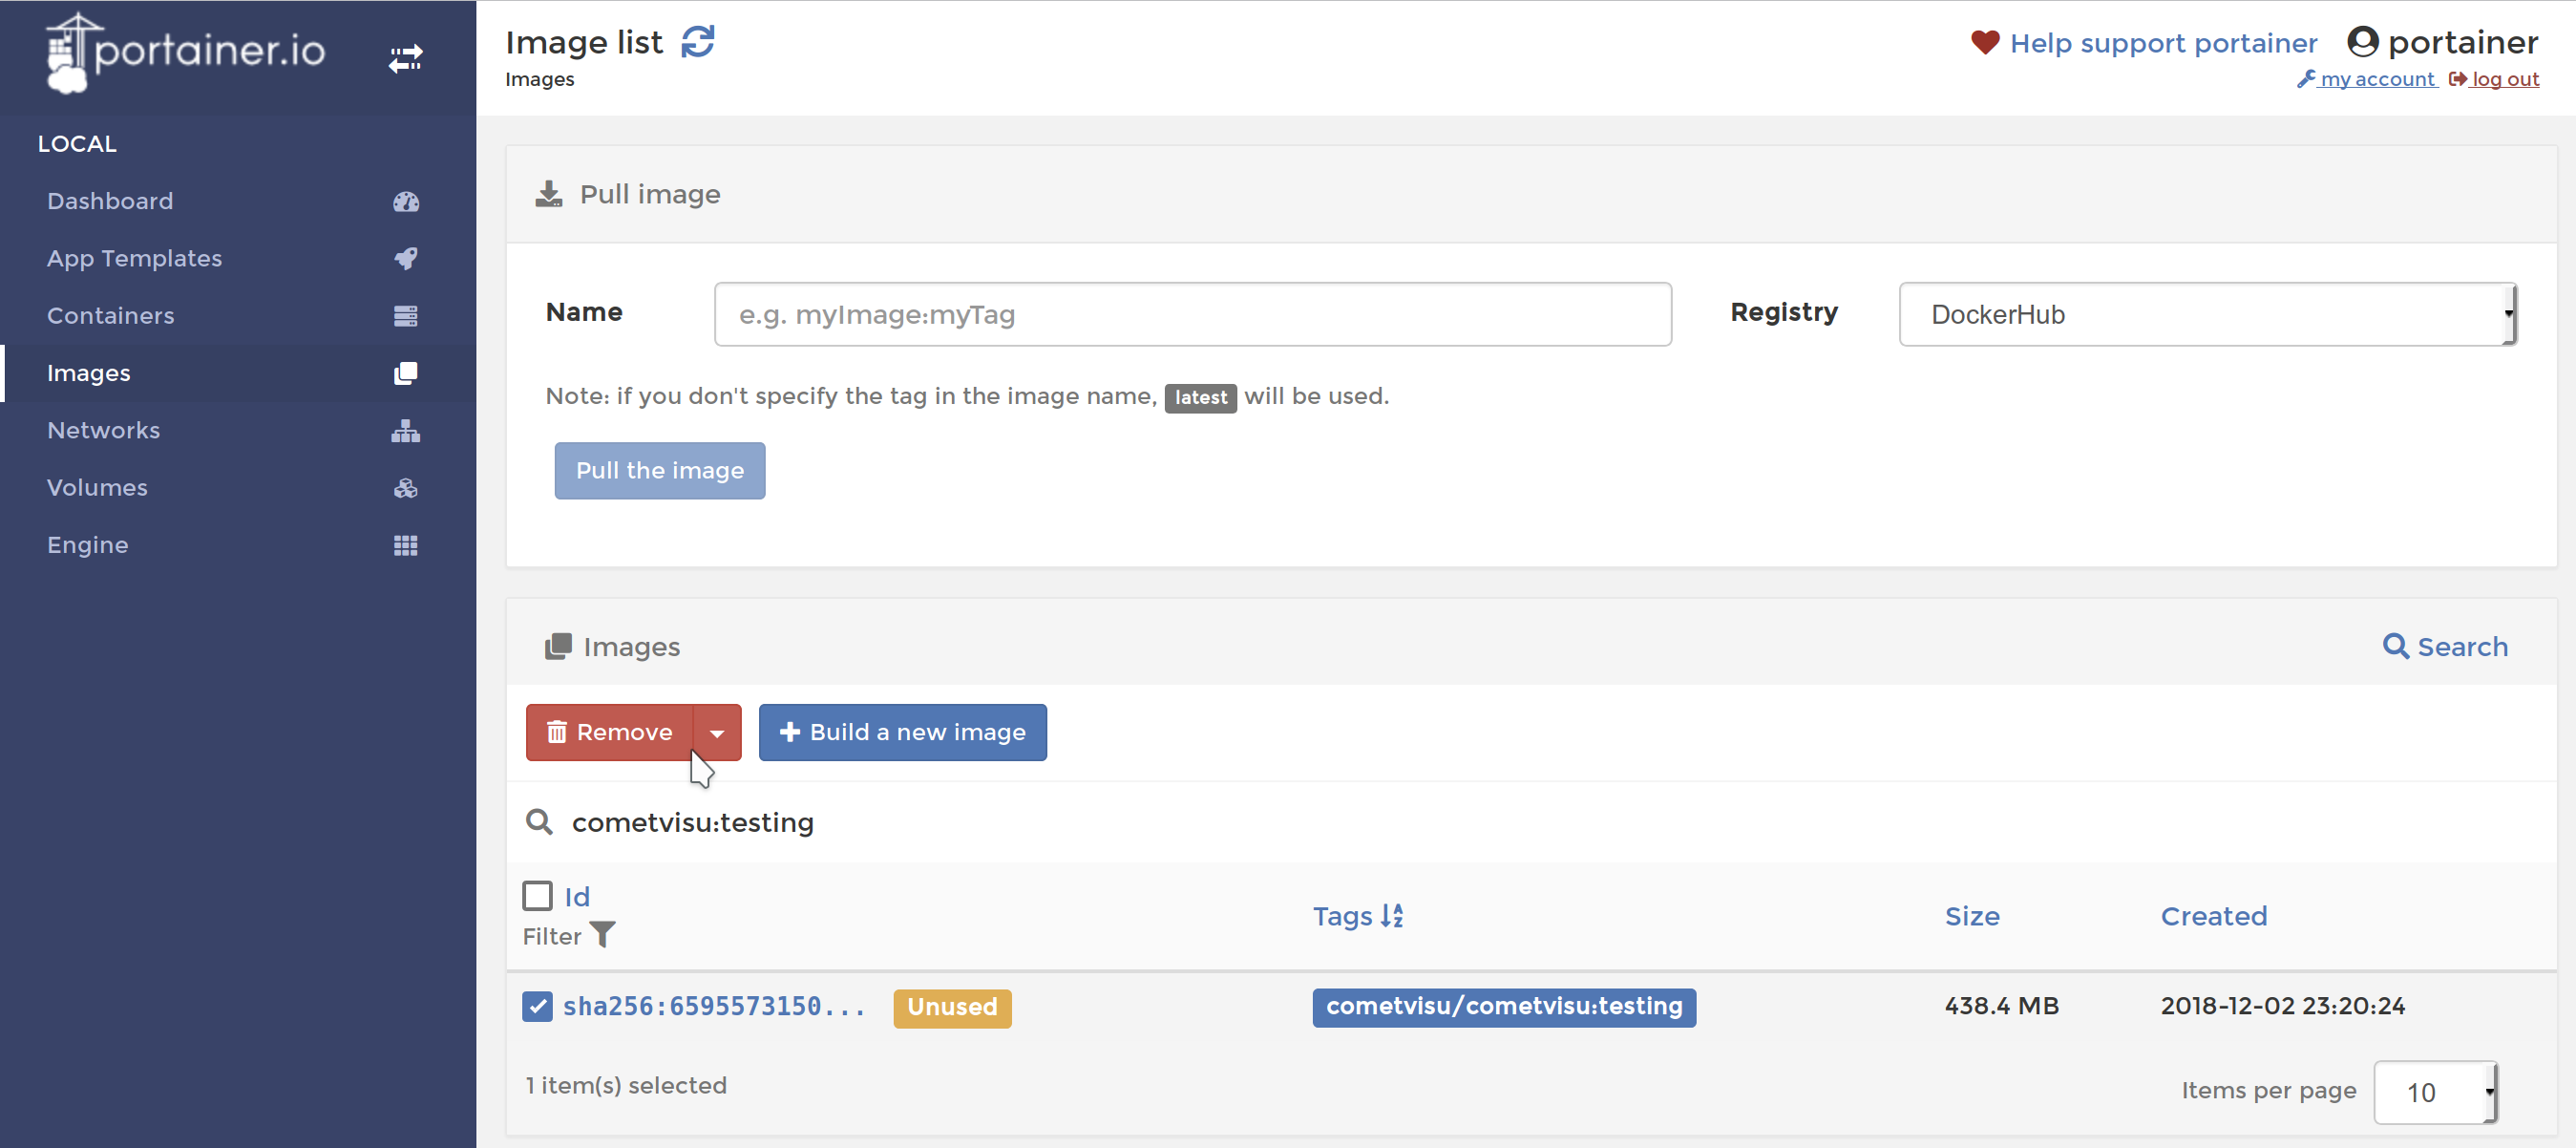
Portainer Dialog to remove an image
Development version
Basically, the same steps as for the release have to be carried
out for the current development version. Although theoretically
the same configuration volume can be used as for the productive
version, a separate volume (for example CometVisuTestConfig)
should be created, as the format of the config files may change
incompatibly due to future updates.
As described under Docker the newest
Development version the tag testing. Thus, under
Creating the container as name cometvisu/cometvisu:testing
must be used.
In order to have a uniform environment for error reporting, etc. the testing version should be installed with these parameters:
Container:
Name:
CometVisuTestImage configuration: Name:
cometvisu/cometvisu:testingPort mapping: host
28080, container80Advanced container settings:
Volumes: Volume mapping
container:/var/www/html/resource/config⭢volume:CometVisuTestConfigcontainer:/var/www/rrd⭢volume:RRD(Optional)
Env: Environment variables
name:CGI_URL_PATHwithvalue:/proxy/visutest/cgi-bin/
Proxy:
URL:
visutest, Targethttp://127.0.0.1:28080/